Saturday, April 30, 2011

Succulent Garden

I have been in love with succulent container gardens lately. 

Image Source: chicweed.wordpress.com

Image Source:  illustratedgallivant.com

Not only do they look really great, but...apparently, they are really easy to take care of since they're native desert plants that require little water. 

So off I go to Home Depot yesterday to try my hand at creating a garden of my own.  I picked up a few succulents for about $2.50 a piece and a bag of cactus soil for $3.97.

I started out by using a vase I already had at home.  I filled the bottom with a couple of inches of gravel from our garden to allow for drainage.


Next I added a good amount of cactus potting soil.


Finally, I added my succulents, a few stones and some moss that I had lying around the house.  What?  You don't have bags of moss lying around your house?


All done!  I love, love, love this arrangement!  So pretty and so simple.

On a side note, if you've tried any of my recipes or projects, please take a picture and share with me!  I'd love to see them and feature them on my blog!

Have a great weekend!

Friday, April 29, 2011

Frozen Key Lime Pie with Macadamia Nut Crust


Remember earlier in the week when I promised there would be good stuff coming up?  Well here's what I was talking about.  This pie is delicious and really easy to make.  Coincidentally, these are the two stipulations I have for anything I cook.  Lucky me I found this recipe on the Dukes and Duchesses blog.

Let's get started!  First we're going to prepare the crust.  Start by toasting your shredded coconut in a dry skillet over medium heat.  Be careful, it burns quickly...burnt coconut is really gross by the way.  Don't ask how I know this.  The key here is to stir constantly.


Next we're going to put 3/4 cup of the coconut (remember to save about 1/4 cup for topping the pie), the macadamia nuts, vanilla wafers, butter and flour in a food processor.  Grind until crumbly, you know, like a pie crust.


Once finished, press the scrumptious mixture into a 10" glass pie plate and bake for 15 minutes.


While your lovely crust is baking, prepare the pie filling.  This is the hard part folks, so brace yourselves.  Combine all of the filling ingredients in a bowl and stir until smooth.  Whew...glad we got through that!


That's it!  As soon as your crust is done baking, take it out and let it cool completely.  Next, pour in your filling and top with the remaining coconut.  Freeze for about two hours (if you can hold out that long...I couldn't).


Enjoy!

Frozen Key Lime Pie with Macadamia Nut Crust

The Crust:
1 cup shredded coconut
1 cup macadamia nuts
1/4 cup butter, softened
20 vanilla wafers
2 tablespoons flour

The Filling:
1/2 cup fresh lime juice (about 6 limes' worth)
grated zest of 2 limes
1 can sweetened condensed milk {I use fat-free}
2 cups whipped topping, such as Cool Whip

Heat the oven to 375 degrees.

In a large dry skillet on medium heat, stir the coconut until it turns golden brown, 3 to 4 minutes.

Put 3/4 cup of the coconut, the nuts, butter, vanilla wafers, and flour into a food processor and process until the consistency of very coarse crumbs.  Save the remaining 1/4 cup coconut for topping.

Pat the crumb mixture into the bottom and sides of a 10-inch deep-dish pie plate and bake 15 minutes.  The crust needs to cool completely, so you may want to put it in the fridge, uncovered, while you make the filling.

Mix all the filling ingredients together and spoon the mixture into the cooled crust.

Sprinkle with the reserved 1/4 cup toasted coconut.

Freeze at least 2 hours before serving.

Thursday, April 28, 2011

Weekly Grocery Store Bouquet

This week I decided to splurge a little on my grocery flowers.  I spent $8.  My rule is $6.  I just fell in love with the cabbage leaves and had to incorporate them into my arrangement.


Have a great day!

Wednesday, April 27, 2011

Squash and Spinach Casserole. Yum!!

Well, I'm finally back after a week of sickness that has affected every member of our family! We were able to get one semi good day where all of us were at least mobile and made it to my in-laws for Easter. It all went down hill from there. As it stands, my husband is the one still down for the count. Poor guy is competing in a triathlon next week so this is not good for his training!


Okay, back to cooking! I made a fantastic vegetarian meal last night that was scrumptious! I got the recipe from, where else, Cooking with Chopin, Living with Elmo. I just love her site.

First off, a couple of tips before you even begin this dish. 1. Don't start cooking at 6:30, otherwise you won't be eating until 8:00, throwing bedtime schedules off, leading to a cranky morning...but I digress. 2. Have your cornbread already made before you start the casserole and things will go a lot quicker. 3. Defrost your frozen spinach before beginning to cook. I know, common sense to most. I'm obviously not most.

Let's get started!

First, you're going to want to dice up a yellow onion. I live in Texas y'all and we've got BIG onions here so I only used half of one.


Next, slice up two yellow squashes. First cut in half lengthwise, then cut each half in half lengthwise. Once all of that lengthwise cutting is done, slice into 1/2" pieces.


Now we're ready to get cooking! Heat your olive oil between medium low and medium heat. You're going to want your veggies to gently sauté, not burn. Add your diced onion and sauté for about 10 minutes, or until they're clear and golden.


Add your squash, spinach and salt/pepper and continue sautéing for another 10 minutes or until the squash is nice and soft. Note that there is no picture of the spinach. It's okay, just envision your lovely spinach being added at this time. Moving on.


Once all of these healthy veggies are done doing their thing, you're going to add your crumbled, already cooked, cornbread and give it a good stirring.


Once stirred, add the can of cream of mushroom soup and stir. So much for the healthy.


Next add your cheese and stir. Oh yeah, health factor just keeps moving on down here.


Now, in case you forgot to add the spinach, go ahead and do that now. It's okay, it happens to all of us. Then, spoon the yummy mix into a butter-greased baking dish.


Sprinkle the top with some more yummy cheese.


Pop that baby in a 350 degree oven and bake for about 25 minutes or until the cheese is golden brown.


Finally, enjoy!  Okay, so it doesn't look gorgeous in the picture but it tastes gooood!  M loved this dish, which is amazing since she isn't too keen on veggies or cheese.

BTW, I served this as our main dish. But it would also be great as a side, which is where the leftovers will end up tonight.

Lots of good stuff coming up this week. Stay tuned!

Squash and Spinach Casserole
Serves 4-6

1 medium yellow onion, finely diced
1 tablespoon olive oil
2 yellow squash, quartered lengthwise and chopped into 1/2" slices
1 10 oz. box of frozen spinach, thawed and squeezed dry
1 8.5 ounce box of Jiffy cornbread mixed, prepared and crumbled
1/2 teaspoon salt
Freshly ground black pepper to taste
1 10.75 ounce can Cream of Mushroom soup (or Cream of Celery)
1 and 1/2 cups shredded Monterey Jack cheese, divided
1/4 cup shredded mozzarella cheese

Saute onion in olive oil until soft, about 10 minutes.  Add squash and spinach and cook until over medium heat until squash is soft, about another 10 minutes. 

Add salt and pepper.

Add in the crumbled cornbread and mix well.

Add in the can of soup.

Mix in 1 cup Monterey Jack cheese.

Spread in greased 8x8 baking dish.

Top with 1/2 cup Monterey Jack cheese followed by the mozzarella cheese.

Bake at 350 degrees for 25 minutes, or until cheese is well browned.

Thursday, April 14, 2011

Cupcake in a Jar


OMG, I think I've died and gone to heaven.  I ran across these amazing looking cupcakes that are packaged in jelly jars over on the Cakies blog.  Genius!  These babies are definitely going to be party favors at a baby shower I'm hosting in July.  So cute...and easy!

First, I started off with a box cake mix.  I wasn't feeling very ambitious today.  I followed the directions and made the batter.  See, easy, right?


Next, I filled the the greased cupcake pan (no liners, although next time I'm using liners so they don't stick) about 2/3s full of batter and baked according to the directions on the box.  By the way, an ice cream scoop is the perfect size for making cupcakes.


While these were baking, I made a quick butter cream frosting recipe that was on the back of the powdered sugar package.  Sorry, package is in the trash, so no recipe!  Are you feeling just how gourmet these guys are?  Yeah, me neither.

Once they were cooked, I allowed them to cool.  I sliced the ones that didn't hang on to the pan for dear life in half and dug the other ones out with a spoon.  Thankfully this project is so forgiving that you can totally screw the cupcakes up and no one will know the difference.

Now the fun part.  Put the bottom half of your cupcake in the jelly jar.  Pipe some icing on top.  On a side note, I don't own a pastry bag set so I just spooned some icing into a zip lock bag and cut off one of the corners.  It worked beautifully and there was zero cleanup.  Bonus!


Now, layer the top part of your cupcake on top of the icing and then pipe some more icing.  A cupcake with double the icing?  Definitely a winner in my book.


The only thing left to do is add sprinkles and package it up!  See.  Sooooo easy!


What's awesome about these is that they have a shelf life of about a week, or they can be frozen if for some really strange reason they're not consumed in that time frame.  Never going to be able to test out that theory in this household!  I delivered cupcakes to a few of our neighbors today and it was absolutely effortless.  No plates to return or flimsy paper plates with knocked over cupcakes.  I'm telling you, genius!

Enjoy!

Wednesday, April 13, 2011

Fresh Flowers

I used to think that the only way to have beautiful flower arrangements in my home was to hope and pray that someone would think enough of me to have a beautiful bouquet delivered to my door.  Ha!  Still waiting for that to happen.

Instead of going through life living with faded plastic floral arrangements, I've been picking up whatever bouquet the grocery store has on sale each week.  As a rule, I never pay more than $6.00 for the bouquet.  Have I mentioned before that I'm cheap?

Here's my latest example.  Randall's had bouquets of carnations on sale for $4.00.  Normally I wouldn't go for the carnations, but I'm so glad I did this time.  


Once I got home I trimmed the stems to fit in a small fish bowl and just started sticking the flowers in there.


It's amazing how a dinky little bouquet can all of a sudden become a centerpiece...well two actually.


Now go out and get some flowers, you'll be glad you did.

Tuesday, April 12, 2011

Mmmm...Bacon


I'm in love, seriously in love with this pasta. I mean, hello? Pasta AND bacon! I've made this dish twice now and it's definitely a winner in our house. M even likes it!
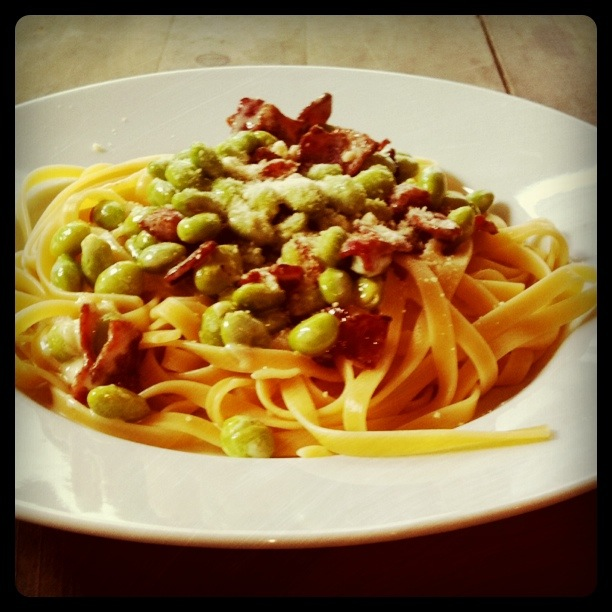
I found the recipe at Cooking with Chopin, Living with Elmo. She has step-by-step instructions, but seriously it's so easy to make you don't really even need them.

Pasta with Edamame and Bacon
Serves 3-4

1/2 pound pasta (fettucchine, thin spaghetti, linguine, or even cheese tortellini), cooked according to package instructions
4 slices bacon, cut into 1/2-inch pieces
1 cup frozen edamame (soybeans), cooked (or substitute frozen peas)
1 cup heavy cream
1/4 teaspoon salt

In a large skillet, saute bacon for 7-8 minutes over medium-high heat.  Using a slotted spoon, tranfer cooked bacon to a plate lined with a paper towel.  Reserve 1 tablespoon of the bacon grease and discard the rest.  Whisk cream into the reserved bacon grease and whisk over medium-high heat for another 7-8 minutes until the cream has thickened and "reduced".

Add the cooked bacon back to the pan; also toss in the cooked edamame (or peas, if using).  Stir together to mix well.

Stir cooked pasta into the sauce.

Top with Parmesan cheese.

Monday, April 11, 2011

Instagram

I have a new obsession...Instagram! If you have an iPhone, this little FREE app is a must have. It's super simple. Just snap a photo, or choose one from your photo library, and play with the different filters Instagram offers. I love the way it makes my "flat" photos come alive and look like professional pics!

Here are a few of my favorites.


Saturday, April 9, 2011

Updated Spring Wreath

After not really loving my spring wreath I made a couple of days ago, I decided to beef it up a little bit.  I bought a wreath form from Michaels and started wrapping yarn around, and around, and around it for about two hours.  Finally, the entire wreath was covered and  I simply pinned the braided wreath directly to it with some straight pins. 

Much, much better now that the scale is right.  What do you think?

Before:

After:

Friday, April 8, 2011

Art Set Birthday Gift


If you have a young, school-age child, then you're feeling my pain when it comes to endless birthday parties.  We try to make it to about half of the ones M gets invited to.  Otherwise, most of our weekends would be dominated by Pump it Up (an inflatable play place, which seems to be THE place to have a preschool party).  As it stands now, we have a party to go to this weekend and next weekend...incidently both at the same place. 

Other than completely dominating your weekends, 15 to 20 kid parties a year can also dominate your bank account!  I came up with a really cute, inexpensive birthday gift that I think is going to be our go-to gift this year.  I found a cute 100-piece art set at Michaels the other day, on sale for $2.97!  I picked up a painting pad to go with it for $3.00 and a craft apron for $2.00.  I'm lucky enough to own an embroidery machine so I embroidered the child's name on the apron.  If you don't have a machine, there are tons of different style iron-on letters that you can quickly pop on there.  If the apron is for a girl, iron-on rhinestones would look great also.

So, for a grand total of $8.00, you can have a personalized gift that I think will last a lot longer than whatever the hot movie character figurine of the moment will.

Have a great weekend!

Tuesday, April 5, 2011

Spring Wreath on the Cheap

**Updated!  Check out the new and improved wreath here!

So, my lovely husband has put a moratorium on spending.  This directly conflicts with my need to decorate for Easter.  Enter Carolyn's Homework blog.  She posted this awesome tutorial for a braided yarn wreath that I thought would look great with my French country-style house.


I'm disappointed in the way that mine came out.  I think that I should have used a thicker yarn or at least used more strands for each braid section.  Also, making a perfect circle with a wire hanger...not easy!  All in all, I think it will do for a couple of weeks...or at least until I get the okay to shop again.  :-)

You can find the full tutorial on Carolyn's Homework, which by the way I highly recommend spending some time on.  She is amazing and has the best ideas.

Have a great day!

Sunday, April 3, 2011

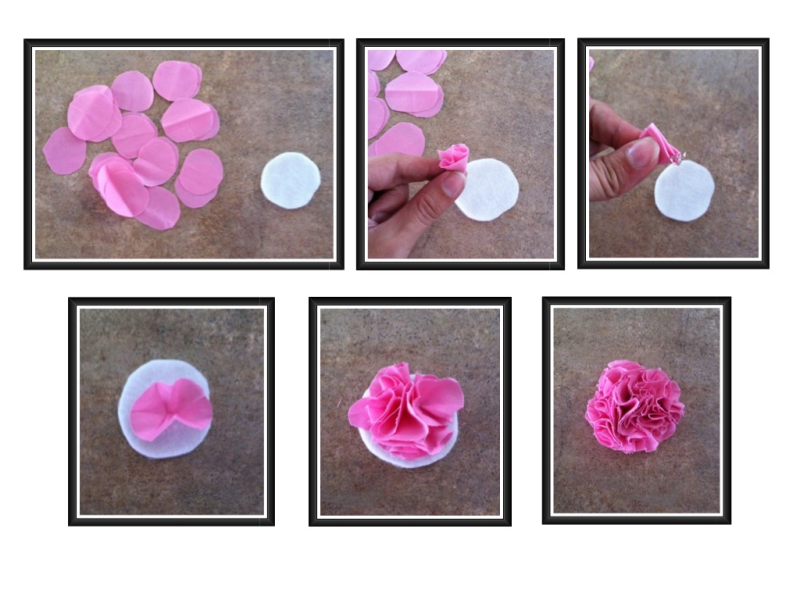
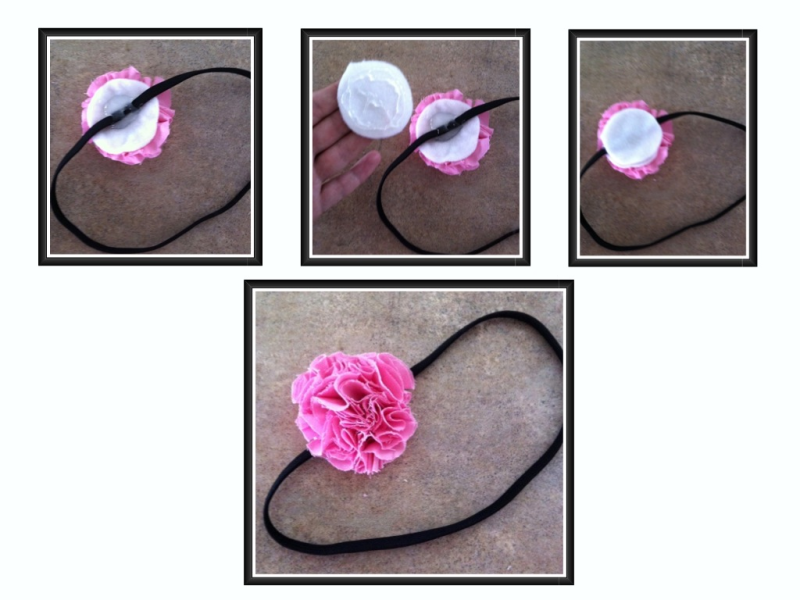
Fabric Flower Headband

I found this super cute and super easy fabric flower headband tutorial on Little Miss Momma today. I was shocked at how quickly I was able to make these...20 minutes from start to finish. Don't be daunted by the prospect of cutting out 20-30 fabric circles. Since they don't have to be perfect, I just took the length of my fabric, folded it over about 2 inches and started cutting half circles out. It took about 5 minutes to cut all of them out. Also, don't worry about the fabric fraying, it adds to the charm of the flower.

I apologize for the photos. I took them with my iPhone and made the tutorial on Moodboard since I'm currently without a computer and am putting this post together on my iPad.

For the full tutorial visit Little Miss Momma, she has much more detailed instructions. Have fun!