Wednesday, May 18, 2011

Pecan-Crusted Chicken with a Sweet Corn Reduction Sauce


I'm back!  Did you  miss me?  So M's after school activities have ended for the year which means that she gets home REALLY early every day.  Wow, it's amazing how much difference just a couple of hours a day make.  I honestly haven't had the cooking/creating bug lately and so therefore don't have much to share this week.  I did make a delicious meal last week though that I'm just now getting around to posting.

I used Rachael Ray's pecan-crusted chicken recipe as the basis to make this yummy dish and I found a sweet corn reduction sauce recipe here.

First, let's talk about preparation.  It's amazing how easy it is to follow a recipe when you have all of your ingredients chopped up, measured out and ready to go before you start cooking.  I'm going to try to get better at doing this.


Before we get started with the sauce, get your oven preheating to 400 degrees.  Okay, now let's make the sweet corn reduction sauce.  We're going to add our frozen sweet corn and diced onions to a pan with some heated olive oil.  Saute for a about a minute.


Now, add your sliced jalepenos and heat until the liquid is reduced by half, about 10 minutes.  Don't worry, it doesn't make a spicy sauce.  Your kids will still eat it.  Side note, I omitted the bell pepper simply because I didn't have one.


Here's the shot of the reduced liquid.   Next time I'll let it reduce down a bit further since I found the sauce a little too soupy.  Add your honey, salt, pepper and lemon juice now.


Once you're done reducing, set your sauce aside while you get your chicken going.  We're going to start by putting our pecan pieces (which by the way, I forgot to toast and I just bought a bag of pecan pieces and skipped the food processor step), bread crumbs, salt, pepper and basil in a shallow baking dish.


Coat your chicken with honey mustard and then give them a generous coating of the pecan mixture...yum!  I thought I would spare you the picture of the raw chicken breasts with mustard rubbed on them.  For some reason it grosses me out to see pics of raw chicken.  Weird, I know.


That's it my friends!  Just place your chicken on a sheet of parchment, to make clean up easy, drizzle with some olive oil and bake for about 15 to 20 minutes.  Remember, always use a meat thermometer to check for doneness.

Now, back to the sauce.  While your chicken is baking, heat your sauce back up and then pour your reduction into a blender and blend until all of the solids are liquified.  Or, if you were a better a planner, you could have been making your sauce while the chicken was cooking.  See?  Aren't you glad I'm trying all of these recipes out for you so you know what not to do?  Feel free to leave a comment thanking me if you'd like.  Whew, I crack myself up.

Where were we?  Oh yeah, blended sauce.  Here's what mine looked like.  Hopefully yours will be a bit thicker so that your significant other doesn't ask if it's soup.


Simple recipe, right?  I guess I got a little too excited, because I forgot to take any pictures between now and serving the dish.  I think you can all figure it out though.  I served the meal with mashed potatoes.  Here's a tip.  Instead of using butter, I used the new Philadelphia cooking creme in Italian Cheese and Herb.  Wow.  Best mashed potatoes that I've ever made (I swear I'm not getting compensated by them in any way, shape or form).

Enjoy!

Sweet Corn Reduction Sauce

1/2 cup fresh or frozen corn kernels
1 teaspoon minced garlic
1/4 cup diced onion
1 1/4 teaspoons olive oil
1 teaspoon minced jalapeño pepper
2 tablespoons minced red bell pepper
1 1/2 cups low-sodium chicken stock
1 tablespoon honey
1/2 teaspoon salt
Pinch of black pepper
2 teaspoons fresh lemon juice

In a medium pan, sauté corn, garlic, and onion in oil over medium heat 1 minute. Add jalapeño and bell pepper. Cook 30 seconds. Add stock. Reduce liquid by half. Season with honey, salt, pepper and lemon juice. Transfer to blender and puree.

Pecan-Crusted Chicken

1 cup pecans. toasted
1/2 cup bread crumbs
1 teaspoon dried basil
4 skinless, boneless chicken breasts (about 1 1/2 pounds total)
1/4 cup honey mustard

Preheat the oven to 400°. Using a food processor, grind the pecans into fine crumbs. Transfer to a wide, shallow bowl and stir in the bread crumbs and basil. Season with salt and pepper. Rub each chicken breast with honey mustard, then coat with the pecan mixture. Place on a nonstick baking sheet and drizzle with 2 tablespoons olive oil. Bake until the juices run clear, 15 to 20 minutes.

Oh, I have to share these pics of M trying out the dish, which she loved by the way.

First one, "Yum!"  Just so you know, it's well into the 80s here.  I have no idea why she is wearing a knit hat...with her ballet recital outfit.


Second, "I'm not liking it anymore."  :-(


Finally, "I'm just kidding!  This rocks!"  What a goof ball.


Tuesday, May 3, 2011

Leftover Easter Candy

I believe that I've mentioned before that I'm cheap...really cheap.  I mean, who doesn't love getting a deal?  Enter my love of couponing.  Don't get me wrong, you're never going to see me on TLC's Extreme Couponing.  You'll definitely see me in the store, mostly Target, a couple of times a week though getting some extreme deals.


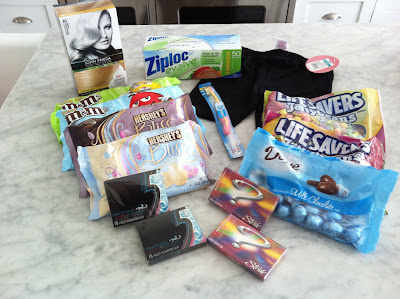
Let's examine this week's goodies.  Thanks to Easter clearance, the candy is super cheap this week.

John Frieda Hair Color - $11.99 ($5.00 Target coupon) ($5.00 manufacturer coupon) = $1.99
Ziploc Baggies - $1.79 ($2.00 coupon when you buy 2 bags of M&M's) = $0.21
2 Bags of M&M's - $1.44
Toddler Shorts - $4.50 (20% off Target mobile coupon) = $3.60
2 Bags of Hershey Bliss - $1.74 ($1.50 manufacturer coupon) = $0.24
2 Bags Lifesavers Jelly Beans - $1.24 ($1.00 manufacturer coupon) = $0.24
1 Bag Dove Chocolate - $0.87 ($1.00 manufacturer coupon) = $0.13
2 Packs of 5 Gum - $1.24 ($1.00 manufacturer coupon) = $0.24
2 Packs of Stride Gum - $0.96 ($1.00 manufacturer coupon) = $0.03
Aquafresh Toothbrush - $1.99 ( $1.00 Target coupon) ($1.00 manufacturer coupon) = $0.01

Total Spent = $7.37 ($5.00 Target Gift Card earned last week) = $2.37!

Okay, so now what to do with all of this candy?  Let's see, I scoured my trusty blogs and of course, they didn't let me down.  I found some really fun things to do with leftover candy.

Jelly Beans
These jelly bean bracelets from Quirky Momma are so cute.  I know that M and her friends will have a blast making them.  Definitely something we'll do once school is out.


I had forgotten that jelly beans make excellent fillers for cookie and cake pop displays!  These sugar cookie pops from Oh How Posh are so cute sitting in their bed of jelly beans!


Chocolate
There are tons of things you can do with leftover Easter chocolate.

1. For starters, chop it up and use it in place of chocolate chips in cookie recipes.  Honestly, I like chunks better than chips anyway.

2. You can also melt it in a saucepan with a little bit of cream to make a yummy chocolate sauce for ice cream sundaes.

3. Chocolate chunk pancakes.  A favorite in our house.

4. Give them away to your friends.  I have a feeling they're just about OD'd on chocolate right now so maybe wait a bit and surprise your neighbor that gave up M&M's for Lent with a bag of M&M's?  (Hey neighbor, you know who you are!)

Or, you could just open up all the bags and consume them all by yourself.  Probably not the best idea if you don't want to be mistaken for one of the performers at Sea World this summer!

Sunday, May 1, 2011

Burgers!


In honor of the weekend, let's grill some burgers!  The weather in Houston this week has been amazing!  Cool temps, low humidity and breezy.  Everything spring weather should be but usually isn't here!  Edited to add that by the time I posted this we're back to hot and super humid.  Bummer.

First, let's just get this out of the way.  Ladies, you can use the grill.  There.  I said it.  It's a well known fact in our house that I am the one that does 99% of the grilling.  I don't understand why so many women are intimidated by a gas grill.  It's really simple ladies.  Turn it on, let it heat up, give it a good scraping to make sure it's clean and you're ready to go!  A huge plus...no dishes to clean up!  Grilling is definitely my preferred method of cooking when the weather is nice.

Okay, on to the burgers.  These are really simple.  No crazy recipe here, just my normal way of doing burgers.  First I start out by making an herb butter.  To start, get a stick of unsalted butter and lay it on a piece of plastic wrap.  Next, fold in some chopped garlic and fresh herbs of your choice.  I used basil here since it's what I have growing right now.


Once you have your garlic and herbs incorporated, form the butter into a log shape, wrap it up and pop it into the freezer for a few minutes to harden.


Now, take your ground beef and shape into patties.  Make an indention in each patty and put a slice of the hardened butter into each indention.  Cover up the butter by molding the meat around it.  Basically you'll have a pat of butter on the inside of your patty.  This makes your burger super delicious!


After you're done embedding the butter, sprinkle each patty with cracked pepper and sea salt.  Now we're ready to grill.  Place your patties on a grill that's been preheated on high.  I take a little olive oil and oil my grates before placing the patties so that they won't stick. Cook for about 7 minutes per side, or until a meat thermometer registers well done.  I know, many people scoff at the idea of well done hamburgers but I'm not willing to chance getting sick.  So I suggest cooking your burgers people!  Also, a couple of minutes before the burgers are ready, use some of your herb butter for the buns and throw them on the grill.  Delish!


See!  Wasn't that easy?  Now make your plate of garnishes.  I like to use little heirloom tomatoes, provolone, avocado, grilled onions, bacon or prosciutto.  Don't be afraid to stray from the normal toppings.


I served this particular meal with a little Caprese salad made with the leftover tomatoes.  My husband says he's definitely a fan of my blogging if it means more meals like this!


Okay ladies, if you haven't already, get out there and try your grill!  Also, let me hear from you if you're the designated grill master in your house!

Saturday, April 30, 2011

Succulent Garden

I have been in love with succulent container gardens lately. 

Image Source: chicweed.wordpress.com

Image Source:  illustratedgallivant.com

Not only do they look really great, but...apparently, they are really easy to take care of since they're native desert plants that require little water. 

So off I go to Home Depot yesterday to try my hand at creating a garden of my own.  I picked up a few succulents for about $2.50 a piece and a bag of cactus soil for $3.97.

I started out by using a vase I already had at home.  I filled the bottom with a couple of inches of gravel from our garden to allow for drainage.


Next I added a good amount of cactus potting soil.


Finally, I added my succulents, a few stones and some moss that I had lying around the house.  What?  You don't have bags of moss lying around your house?


All done!  I love, love, love this arrangement!  So pretty and so simple.

On a side note, if you've tried any of my recipes or projects, please take a picture and share with me!  I'd love to see them and feature them on my blog!

Have a great weekend!

Friday, April 29, 2011

Frozen Key Lime Pie with Macadamia Nut Crust


Remember earlier in the week when I promised there would be good stuff coming up?  Well here's what I was talking about.  This pie is delicious and really easy to make.  Coincidentally, these are the two stipulations I have for anything I cook.  Lucky me I found this recipe on the Dukes and Duchesses blog.

Let's get started!  First we're going to prepare the crust.  Start by toasting your shredded coconut in a dry skillet over medium heat.  Be careful, it burns quickly...burnt coconut is really gross by the way.  Don't ask how I know this.  The key here is to stir constantly.


Next we're going to put 3/4 cup of the coconut (remember to save about 1/4 cup for topping the pie), the macadamia nuts, vanilla wafers, butter and flour in a food processor.  Grind until crumbly, you know, like a pie crust.


Once finished, press the scrumptious mixture into a 10" glass pie plate and bake for 15 minutes.


While your lovely crust is baking, prepare the pie filling.  This is the hard part folks, so brace yourselves.  Combine all of the filling ingredients in a bowl and stir until smooth.  Whew...glad we got through that!


That's it!  As soon as your crust is done baking, take it out and let it cool completely.  Next, pour in your filling and top with the remaining coconut.  Freeze for about two hours (if you can hold out that long...I couldn't).


Enjoy!

Frozen Key Lime Pie with Macadamia Nut Crust

The Crust:
1 cup shredded coconut
1 cup macadamia nuts
1/4 cup butter, softened
20 vanilla wafers
2 tablespoons flour

The Filling:
1/2 cup fresh lime juice (about 6 limes' worth)
grated zest of 2 limes
1 can sweetened condensed milk {I use fat-free}
2 cups whipped topping, such as Cool Whip

Heat the oven to 375 degrees.

In a large dry skillet on medium heat, stir the coconut until it turns golden brown, 3 to 4 minutes.

Put 3/4 cup of the coconut, the nuts, butter, vanilla wafers, and flour into a food processor and process until the consistency of very coarse crumbs.  Save the remaining 1/4 cup coconut for topping.

Pat the crumb mixture into the bottom and sides of a 10-inch deep-dish pie plate and bake 15 minutes.  The crust needs to cool completely, so you may want to put it in the fridge, uncovered, while you make the filling.

Mix all the filling ingredients together and spoon the mixture into the cooled crust.

Sprinkle with the reserved 1/4 cup toasted coconut.

Freeze at least 2 hours before serving.

Thursday, April 28, 2011

Weekly Grocery Store Bouquet

This week I decided to splurge a little on my grocery flowers.  I spent $8.  My rule is $6.  I just fell in love with the cabbage leaves and had to incorporate them into my arrangement.


Have a great day!

Wednesday, April 27, 2011

Squash and Spinach Casserole. Yum!!

Well, I'm finally back after a week of sickness that has affected every member of our family! We were able to get one semi good day where all of us were at least mobile and made it to my in-laws for Easter. It all went down hill from there. As it stands, my husband is the one still down for the count. Poor guy is competing in a triathlon next week so this is not good for his training!


Okay, back to cooking! I made a fantastic vegetarian meal last night that was scrumptious! I got the recipe from, where else, Cooking with Chopin, Living with Elmo. I just love her site.

First off, a couple of tips before you even begin this dish. 1. Don't start cooking at 6:30, otherwise you won't be eating until 8:00, throwing bedtime schedules off, leading to a cranky morning...but I digress. 2. Have your cornbread already made before you start the casserole and things will go a lot quicker. 3. Defrost your frozen spinach before beginning to cook. I know, common sense to most. I'm obviously not most.

Let's get started!

First, you're going to want to dice up a yellow onion. I live in Texas y'all and we've got BIG onions here so I only used half of one.


Next, slice up two yellow squashes. First cut in half lengthwise, then cut each half in half lengthwise. Once all of that lengthwise cutting is done, slice into 1/2" pieces.


Now we're ready to get cooking! Heat your olive oil between medium low and medium heat. You're going to want your veggies to gently sauté, not burn. Add your diced onion and sauté for about 10 minutes, or until they're clear and golden.


Add your squash, spinach and salt/pepper and continue sautéing for another 10 minutes or until the squash is nice and soft. Note that there is no picture of the spinach. It's okay, just envision your lovely spinach being added at this time. Moving on.


Once all of these healthy veggies are done doing their thing, you're going to add your crumbled, already cooked, cornbread and give it a good stirring.


Once stirred, add the can of cream of mushroom soup and stir. So much for the healthy.


Next add your cheese and stir. Oh yeah, health factor just keeps moving on down here.


Now, in case you forgot to add the spinach, go ahead and do that now. It's okay, it happens to all of us. Then, spoon the yummy mix into a butter-greased baking dish.


Sprinkle the top with some more yummy cheese.


Pop that baby in a 350 degree oven and bake for about 25 minutes or until the cheese is golden brown.


Finally, enjoy!  Okay, so it doesn't look gorgeous in the picture but it tastes gooood!  M loved this dish, which is amazing since she isn't too keen on veggies or cheese.

BTW, I served this as our main dish. But it would also be great as a side, which is where the leftovers will end up tonight.

Lots of good stuff coming up this week. Stay tuned!

Squash and Spinach Casserole
Serves 4-6

1 medium yellow onion, finely diced
1 tablespoon olive oil
2 yellow squash, quartered lengthwise and chopped into 1/2" slices
1 10 oz. box of frozen spinach, thawed and squeezed dry
1 8.5 ounce box of Jiffy cornbread mixed, prepared and crumbled
1/2 teaspoon salt
Freshly ground black pepper to taste
1 10.75 ounce can Cream of Mushroom soup (or Cream of Celery)
1 and 1/2 cups shredded Monterey Jack cheese, divided
1/4 cup shredded mozzarella cheese

Saute onion in olive oil until soft, about 10 minutes.  Add squash and spinach and cook until over medium heat until squash is soft, about another 10 minutes. 

Add salt and pepper.

Add in the crumbled cornbread and mix well.

Add in the can of soup.

Mix in 1 cup Monterey Jack cheese.

Spread in greased 8x8 baking dish.

Top with 1/2 cup Monterey Jack cheese followed by the mozzarella cheese.

Bake at 350 degrees for 25 minutes, or until cheese is well browned.

Thursday, April 14, 2011

Cupcake in a Jar


OMG, I think I've died and gone to heaven.  I ran across these amazing looking cupcakes that are packaged in jelly jars over on the Cakies blog.  Genius!  These babies are definitely going to be party favors at a baby shower I'm hosting in July.  So cute...and easy!

First, I started off with a box cake mix.  I wasn't feeling very ambitious today.  I followed the directions and made the batter.  See, easy, right?


Next, I filled the the greased cupcake pan (no liners, although next time I'm using liners so they don't stick) about 2/3s full of batter and baked according to the directions on the box.  By the way, an ice cream scoop is the perfect size for making cupcakes.


While these were baking, I made a quick butter cream frosting recipe that was on the back of the powdered sugar package.  Sorry, package is in the trash, so no recipe!  Are you feeling just how gourmet these guys are?  Yeah, me neither.

Once they were cooked, I allowed them to cool.  I sliced the ones that didn't hang on to the pan for dear life in half and dug the other ones out with a spoon.  Thankfully this project is so forgiving that you can totally screw the cupcakes up and no one will know the difference.

Now the fun part.  Put the bottom half of your cupcake in the jelly jar.  Pipe some icing on top.  On a side note, I don't own a pastry bag set so I just spooned some icing into a zip lock bag and cut off one of the corners.  It worked beautifully and there was zero cleanup.  Bonus!


Now, layer the top part of your cupcake on top of the icing and then pipe some more icing.  A cupcake with double the icing?  Definitely a winner in my book.


The only thing left to do is add sprinkles and package it up!  See.  Sooooo easy!


What's awesome about these is that they have a shelf life of about a week, or they can be frozen if for some really strange reason they're not consumed in that time frame.  Never going to be able to test out that theory in this household!  I delivered cupcakes to a few of our neighbors today and it was absolutely effortless.  No plates to return or flimsy paper plates with knocked over cupcakes.  I'm telling you, genius!

Enjoy!